Saturday, 17 August 2013

Tomcat server setup

Tomcat server setup
Installing tomcat server
·         Install tomcat server
·         Go to tomcat folder directory( eclipse and tomcat both are downloaded in a same folder)
·         Click on tomcat.exe
·         Open eclipse ide tool (i.e start eclipse)
·         Go to eclipse directory, and open eclipse ide
·         Set up tomcat inside eclipse

·         Select server tab, right click->select new server like below
click on select tomcat versions (example: Tomcat v6.0 Server) from Apache

Click on next
·         Click on browse->go to tamcat directory(Ex: C:\Program Files\Apache Software Foundation\Tomcat 6.0
Once you select Tomcat 6.0, Here click on ok

Here you select jdk1.6.0 from JRE pop up options bcoz Tomcat needs


Click on Finish button

Right click the tomcat bottom, and select start option
Then you will notice Console icon
Note:
 While we are starting tomcat server some times we may get error message, that time we have to change the port no or host name:
1st method:
Steps
·         1. Navigate to
C:\apache-tomcat-6.0.18\conf\server.xml
(The place where you have installed tomcat)
·         2. In server.xml file locate
1.  <!-- Define a non-SSL Coyote HTTP/1.1 Connector on port 8080 -->  
2.  <connector port="8080" maxthreads="150" minsparethreads="25" maxsparethreads="75" enablelookups="false" redirectport="8443" acceptcount="100" debug="0" connectiontimeout="20000" disableuploadtimeout="true">  
3.  <!-- Note : To disable connection timeouts, set connectionTimeout value to 0 -->  
4.  </connector>  
Or
1.  <connector port="8080" protocol="HTTP/1.1" connectiontimeout="20000" redirectport="8443">  
2.  </connector>  

(You can find something similar to the above snippet in server.xml.  It varies according to tomcat version)
change Connector port="8080" to Connector port="8081" or some other port number. Make sure that the port number in not used by some other application.
·         3. Save and restart tomcat.
·         4 .Now try running with the new port number i.e. http://localhost:8081

Mappings of IP addresses to hostnames

(Change localhost to some other name)


Operationg System: 
·         Windows XP
Steps
·         1. Navigate to
C:\WINDOWS\system32\drivers\etc

Or
start->All Programs->Run-> type 'drivers'  (Without quotes)->etc
·         2. Open the file host with a text editor and change
127.0.0.1       localhost
To
127.0.0.1       projectname


·         3. Restart Tomcat and Try http://projectname:8080/

# host file contains the mappings of IP addresses (in our case 127.0.0.1) to 
#host names (localhost). Each
# entry should be kept on an individual line. The IP address should
# be placed in the first column followed by the corresponding host name.
# The IP address and the host name should be separated by at least one
# space.
#
# Additionally, comments (such as these) may be inserted on individual
# lines or following the machine name denoted by a '#' symbol.
#
# For example:
#
#      102.54.94.97     rhino.acme.com          # source server
#       38.25.63.10     x.acme.com              # x client host
*/

You can see the last line that server start up in 1674
Now you can observe that tomcat server has started


 In order to test this, open a browser window and access the default URL


 TYPE URL : localhost:8080

Or

If you change the host name as projectname, then type in the browser address url: projectname:80801 . if you unable to find the server tab in eclipse?

Ans: go to window from eclipse menu->show view->other->and search for server->press ok
1.       When we attempting to test the tomcat server, we may get pagenot found exception?


Ans:
Ans: go to right click on tomcat
Click switch location and click on apply and ok
·         Go to left hand side tomcat server
·         Right click->properties
Double click on configuration like below picture:

·         And make sure
·         Enable “use Tomcat installation”

You may like the following posts:


Friday, 16 August 2013

writing a small Web application

How to write web application? using Eclipse IDE

developing the first servlet program

1. creating the home.html page
2. creating the lifycycleservlet
3. creating deployment descriptor
4. deploying the application
5. running the application


·         Now we are going to write one servlet program
First stop the tomcat server
·         Right click on tomcat button, choose stop option
·         Now we will get like below

Now I want to clear the logs that is place the cursor on logs (text (red color) and right click the mouse , clear.
·         Go to project explorer tab, right click
Select new->other->press enter
·         Here you will have project templates, you will see only if you installed eclipse java ee developer
·         Go to WEB folder->dynamic web project
·         Click on Next button

·         Give any name for project name: I will give “simpleservletproject”, and use the default location that is workspace location, and select the tomcat server (no need to worry by default it will be selected), configuration will be the same tomcat configuration. Every thing I kept default( I didn’t change )

·         Click on next
·         Select scr folder


·         Click on next. I kept all are default (after selecting scr folder)
·         Context root ( I will explain you later this one) right now I want to keep it default
·          
·         And enable generate web.xml deployment descriptor
·         And click finish
·         Now it will display one small dialog box(in some systems) , click on yes
·         Now select the server tab
·         Select deployment descriptor from left hand side folder like below diagram


·         Go to window bar and choose show view->navigator

·         This is how we are organizing the file system, .class path and metadata for eclipse
·         Expand the webContent folder from left side->web
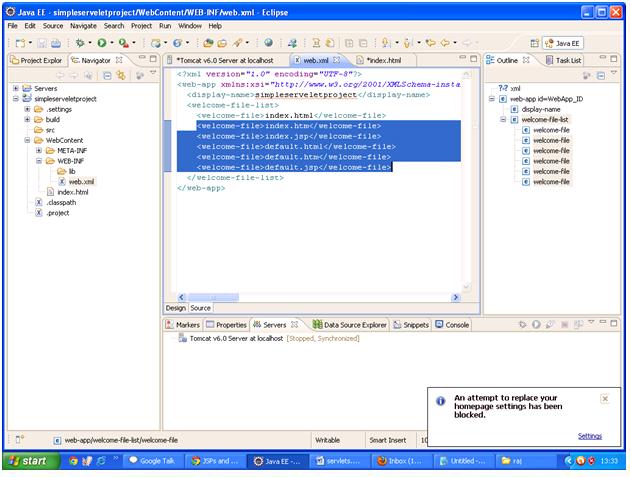
·         Just double click on web.xml file
·         It shows the xml view
·         Click on source tab

·         This is web.xml file,
What is WebContent file? It contains the web files like html, jsp, javascript files
·         Go to WebContent->right click->new->other->
·         Click on html file and click on next
·          
·          give the file name(ex: index.html

·         Click on Next


·         Click on finish button

·         Write the name of the web application at title tag
·         You can write any text message in the body

·         We have web.xml file which actually tells web server
·         You can remove all the tags in the web.xml file
Now go to simpleservletproject folder leftside of the explorer

·         Right click->Run As->Run on Server


·         Click on ok button
·         Which server you want , select  i.e Tomcat server
·         Click on next
·         Select the configuration project
·         Click on finish button
·         Inside eclipse browser tab will be opened and executed the web application
·         Whatever we typed in index.html that is displayed


USING NOTE PAD:


No we will talk about the context


1. creating the home.html page
2. creating the lifycycleservlet
3. creating deployment descriptor
4. deploying the application
5. running te application

1st step:
<html>
 <head>
  <title servlet example </title>
 </head>
 <body>
 <form action="myfirstServlet"><br/><br/><br/>
 <center>
 <input type="submit" value="invoke servlet lifecycle"/>
 </center>
  </form>
</body>
</html>

2. creating the lifycycleservlet

package com.rajendra.servlets;
import javax.servlet.*;
public class LifeCycleServlet implements Servlet
{
 public void init(ServletConfig sc)
 {
  System.out.println("init() method");
 }
 public void service(ServletRequest req, ServletResponse res) throws ServletException, java.io.IOException

 {
  java.io.PrintWriter out=res.getWriter();
  out.println("hi frm lifecycleservlet");
  System.out.println("in service");
 }
 public void destroy()
 {
  System.out.println("in destroy()")
 }
 public String getServletInfo()
 {
  return "LifeCycleServlet";
 }
 public ServletConfig getServletConfig()
 {
  return config;
 }
private ServletConfig config;
}

creating the deployment descriptor


Introduction

Introduction

Standalone application is specific to one computer. So, the resources and data of the application is specific to one computer. AWT frame window, swing frame window applications.
·         Two tier applications needs two computers connected in the Network( generally LAN). So the application data and resources are visible in various computers of that network and only known elements from the network are allowed to access the application.
Ex: Socket applications, JDBC Applications.


·         To execute each java application, one JVM is required. To execute  multiple java applications parallels or simultaneously from a computer multiple JVMS are required in that computer.
·         We can see multiple jvm’s running parallels in a computer to execute multiple java applications simultaneously or parallel.
·         In order to make our applications gloabally make of applications throught web or internet. We need to develop application as web application or website.
·         The resources and data web applications or websites can e accessed globally by using internet through by known or unknown clients.


Friday, 31 May 2013

Servlet programming tutorial for beginners-part –I Login Page

Servlet programming tutorial for beginners-part –I
Creating login page:
·         When the user clicks on login , the request is taken to the validate servlet where the user credentials validated if the user is valid user, username and password is correct forwards the requests to the servlets, which can display message that the user has entered successfully validated to the application .
·         If username is incorrect username or password , the control is forwarded to login page where the username again will shows the message that the username and password is incorrect
·         So this session demo we are going to user completely Eclipse IDE
STEPS:
1.       Open eclipse IDE software, and go to file from main menu
2.       Click on new