Friday 30 August 2013

How does the container know which servlet the client has requested for?

How does the container know which servlet the client has requested for?

A Servlet can have 3 names

1. client known URL name.
2. Deployer known secret internal name (servlet name and file name
3. Actual file name


  • there might be more than one servlet in web container which can do different functionality.

how does the web container knows which servlet  can help that request?
Ans: just take a example: when you take yahoomail.com, type username and password and sends the request to the server. now how does the web container knows which particular servlet in the web application for that yahoo email. there is a servlet for yahoo email, for example that servlet is yahoo servlet
now the container has to know that this yahoo servlet can handle the request which are sent by the client for yahoomail.

  • now lets see how does happen: basically there is a file call web.xml (this is also called the deployment descriptor
  • so web.xml is the main file for web container (master file for web container)
  • basically you have information about the servlet in web.xml file

as you can see the web.xml file below:
<web-app>
----
<servlet>
<servlet-name>Loginserv</servlet-name>
 <servlet-class>com.Login</servlet-class>
</servlet>

<servlet-mapping>
 <servlet-name>LoginServ</servlet-name>
  <url-pattern>/Logon</url-pattern>
 </servlet-mapping>
------
------
</web-app>


  • every servlet in the web application should have an entry into this file the web.xml

for example if you observe the tags, Loginserv which handles the requests the yahoo login

  • i will have the entry for that login servlet in web.xml file so there is a servlet element , servlet name and servlet class(<servlet-name>Loginserv</servlet-name> <servlet-class>com.Login</servlet-class>) so my servlet is Login servlet, so i will write the path for the servlet which is com.Login and i also give some simple name that is Loginserv some readable name to that servlet which im refering. 
  • Now you can also see the another section that is servlet-mapping as below:

<servlet-mapping>
 <servlet-name>LoginServ</servlet-name>
  <url-pattern>/Logon</url-pattern>
 </servlet-mapping>

  • now we have mapped to some servlet class to some servlet name to this element i.e <servlet-name>Loginserv</servlet-name>

 <servlet-class>com.Login</servlet-class>

  • now servlet that can known depending on name which servlet class to invoke and where it is located
  • and how will the servlet know the request was yahoomail.com\login, how will it know for that request is for this servlet class so that is derived in the servlet mapping element
  • again the servlet mapping element we have two tags <servlet-name>LoginServ</servlet-name>

  <url-pattern>/Logon</url-pattern> here the <servlet-name>LoginServ</servlet-name> matches the servlet tag <servlet>LoginServ</servlet> tag which you have given.
and the <url-pattern> is nothing but the url the client has sent the request when the client sends yahoomail.com/logon, it actually matches that URL in the url pattern tag. It sees the client has selected this url <url-pattern>/Logon</url-pattern> so it matches this url present in the mapping tag

  • now it goes to the servlet element <servlet> <servlet-name>Loginserv</servlet-name>
  • and apart from these servlet and servlet mapping elements there might be a number of servlets and servlet mapping elements. so it checks all the servlet elements and matches this servlet name i.e <servlet> <servlet-name>Loginserv</servlet-name> and the this servlet name i.e <servlet-mapping> <servlet-name>LoginServ</servlet-name>
  • now it goes the whats the servlet class and at particula servlet name and it goes to this path i.e com.Login and ultimately it takes that servlet and invokes the methods of that servlets
  • processes the request and sends the response back to the client
  • so this is how a webcontainer can match the request sent by a client url is a valid servlet which is actually serving the request sent by the client

why do we have the URL name?
Ans: we dont want to type whole name in the URL path( ex: con.yahoomail.login details....etc). that is you want to give the client to simple name(yahoomail.com) and second reason is security, that is i dont want to know whole pathe to others, ones the servlet path knows to someone it leads to security problem.

You may like the following posts:


web container

To Execute Java Apps we need JRE+JVM
To execute Applet programs we need Applet viewer
To execute Servlet programs we need Servlet Container or Web Container. Web Servers (Ex: Tomcat, WebLogic) supplies this Servlet, JSP containers.


The client sends the request to the web server and web server sends the request to the web container.
Responsibility of web container is to communicate with the servlet and allow to servlet to build dynamic content and sends the response back to the web container again.
Which will in turn sends the response to the web server which will ultimately go the client here we need to understand one thing HTTP request which sends the client and web container which sends the request is different.
So servlet is a java program which can only understand the objects (but not HTTP request) so Web Container converts the HTTP request into valid request object .
servlet does not have main() and it have call back methods(doGe()), that means web container knows what call methods call for the servlet . In the doGet() method we write the dynamic content.
All out business logic we will write either doGet() or doPost() methods.
Servlet call the doGet() and builds a response to the web container.
Again this response which was sent by the servlet is a java object.
Now web container converts the java objects into HTTP response and sends it back to the client.

Container Roles:

  • Communication support
  • Life cycle management (servlets live and die within the container): Container takes care of whole life cycle (birth to death) of servlet programming.
           Life Cycle Management:
           1. Object creation
           2. Memory Allocation
           3. Calling life cycle methods based on the events that are raised.
           4. Execution of resources
           5. Destruction of object.
  • Multi threading support (every request is assigned by a thread
  • Security (we write the code in side the container, only valid request can go throught servlets but not all the requests)
  • jsp support


You may like the following posts:
Thursday 29 August 2013

Servlet Life Cycle

Servlet Life Cycle

The servlet lifecycle under goes four steps: Last 4th step will not happen immediately after the 3rd step.
the servlet is destroyed after the completion of the request .

1. loading a servlet
2. initializing the servlet
3.. request handling
4. Destroying the servlet


fig: 1 shows

Loading a Servlet

loading and initializing the servlet by the Servlet container. the Web container can load the Servlet at either of the following two stages.
initializing the context, on configuring the Servlet with a zero or positive integer value to load-on startup property.
if the servlet is not loaded in the preceding stage, it may delay the loading process until the Web container determines that this servlet is needed to service a request.

The Servlet container performs the following operations while loading the servlet

Loading: Loads the Servlet class by using the normal java class loading option. servlet class may be loaded a local system, other network system or a remote file system. If the Servlet container fails to load the class, it terminates this process.

Instantiation: creates an instance of the servlet. To create a new instance (obj) of the servlet, the container uses no-argument constructor. The no. of objects for a Servlet instance is as below:

1. if a servlet is not hosted in a distributed environment, and it does not implement the SingleThreadModel interface, the container creates only one instance of the servlet declared in the Deployment Descriptor. A web application configuration file is also known as Deployment Descriptor.

2. If the Servlet is hosted in a distributed environment, the servlet container creates one servlet instance per java virtual machine (JVM)
3. If the Servlet implements the SingleThreadModel, the servlet container may create multiple objects for the servlet. If, in this servlet is hosted as distributable, the Servlet container may create multipel instances per JVM as well.

Intializing a Servlet:

After the Servlet is instantiated, the Servlet container initializes the instantiated servlet object. the container initialize the object by invoking the Servlet.init (ServletConfit) method, which accepts the ServletConfig object reference as a parameter. The servletconfig object allows teh Servlet instance to access name-value configured initialization parameters and other container specific details. The servlet container creates one ServletConfig object per servlet declared in the deployment descriptor.The Servlet Container calls the Servlet.init(ServletConfig) method is used to initialize resources, such as business Factory and JDBC DataSource and implement a code that has to be executed once per instance.
If this process completed successfully, Servlet comes into active state and makes it available and ready to handle requests. Servlet container considers a Servlet object that is initialized successfully only if the init() returns an object within the time period defined by the Web server, successfully without throwing ServletException.

If the Servlet does not initialize the servlet object?

then it will inform the servlet container about it by throwing the ServletException or UnavailableException, where the UnavailableException is a subtype of ServletException. We can create UnavailableException by using any of the following two constructors:

UnavailableException (String msg): instantiates a permanently unavailabe exception with the given message.
UnavailableException(String msg, int seconds)- instantiates a temporarily unavailable exception with the given message and estimated time period; ie: how long it will be unavailable
If the servlet.init(ServletConfig) method throws an exception, the Servlet container does not put Servlet instance into the active state, which means it removes (or destroys) the instance. If an exception iis thrown by the Servlet.init(0 method, the Servlet container performs the following operations.
1. if it throws temporarily UnavialableException, it implies that the Servlet initialization has failed, and will not be available for the specified time period. The Servlet container does not accept any request till the time the Servlet is available. If any request is made, UnavailableException returns the SERVICE UNAVAILABLE (503) response. However, when there is another after the given time period, container can try to instantiate and initialize the Servlet..
2. If it throws permanantly UnavaialbeException, it implies that the Servlet initialization has failed, and will not be available until the context is redeployed.
3. If the servlet doesnt initialize the object, servlet container can not call the destroy().

Example program for Life Cycle Servlet

<HTML>
<HEAD>
<title> Servlet Examples (Example to show Servlet Lifecycle)</title>
</HEAD>
<BODY>
<FORM ACTION=" myFirstServlet "><br/><br/><br/>
<center><INPUT TYPE="submit" value="Invoke Life Cycle Servlet"/></center>
</FORM>
</BODY>
</HTML>


package com.rajendra.servlets;

import javax.servlet.*;


public class LifeCycleServlet implements Servlet {

public void init(ServletConfig sc) {

config=sc;
System.out.println("in Init");
}//init

public void service(ServletRequest req,ServletResponse res) 
throws ServletException, java.io.IOException {

java.io.PrintWriter out=res.getWriter();
out.println("Hello from LifeCycleServlet");
System.out.println("in service");
}//service

public void destroy() {

System.out.println("in destroy");
}//destroy

public String getServletInfo() {

return "LifeCycleServlet";
}//getSI

public ServletConfig getServletConfig() {

return config;
}//getServletConfig

private ServletConfig config;
}//class
//
//D:\\lifecycle>javac  -d . LifeCycleServlet.java
//D:\webtechnologies\servlets\prog\lifecycle>jar -cvf lifecycle.war *


web.xml

<web-app>
<servlet>
<servlet-name>ls</servlet-name>
  <servlet-class>com.rajendra.servlets.LifeCycleServlet</servlet-class>
  </servlet>

<servlet-mapping>
  <servlet-name>ls</servlet-name>
  <url-pattern>/myFirstServlet</url-pattern>
  </servlet-mapping>
</web-app>

How to compile and execute servlets on tomcat server using Note Pad


The servlet example can be created by three ways:

By implementing Servlet interface,
By inheriting GenericServlet class, (or)
By inheriting HttpServlet class

The mostly used approach is by extending HttpServlet because it provides http request specific method such as doGet(), doPost(), doHead() etc.

Here, we are going to use apache tomcat server in this example. The steps are as follows:
Create a directory structure
Create a Servlet
Compile the Servlet
Create a deployment descriptor
Start the server and deploy the project
Access the servlet

Create a Directory Structure:


2. Create a Servlet:

There are three ways to create the servlet.
(a) By implementing the Servlet interface
(b) By inheriting the GenericServlet class
(c) By inheriting the HttpServlet class

The HttpServlet class is widely used to create the servlet because it provides methods to handle http requests such as doGet(), doPost, doHead() etc.

In this example we are going to create a servlet that extends the HttpServlet class. In this example, we are inheriting the HttpServlet class and providing the implementation of the doGet() method. Notice that get request is the default request.

import java.io.*;
import javax.servlet.*;
import javax.servlet.http.*;
public class FirstServlet extends HttpServlet
{
  public void doGet(HttpServletRequest request, HttpServletResponse response) throws ServletException,IOException
  {
   response.setContentType("text/html");
   PrintWriter out=response.getWriter();
   String cont="<html><head><title>First Servlet</title>" +
              "</head><body bgcolor=yellow> <h1> Hello"+
             "</h1></body></html>";
   out.println(cont);
  }
}


Compile the servlet

For compiling the Servlet, jar file is required to be loaded. Different Servers provide different jar files:

Jar file                          Name of the Server

1) servlet-api.jar          Apache Tomcat
2) weblogic.jar            Weblogic
3) javaee.jar                Glassfish
4) javaee.jar                JBoss

Two ways to load the jar file

1)set classpath
2)paste the jar file in JRE/lib/ext folder


Put the java file in any folder. After compiling the java file, paste the class file of servlet in WEB-INF/classes directory.

Now we go for first way
1)set classpath

Go to My computer->out folder drive
go to command prompt:
c:\cd \raj\servlets\demo2
now set the class path
D:\raj\servlets\demo2>set classpath=C:\Program Files\Apache Software Foundation\
Tomcat 5.5\common\lib\servlet-api.jar;
compile the servlet program

/*Note: If we ignore to set the class path we will get the errors
*/

//So setting the class path is mandatory:


D:\raj\servlets\demo2>javac HelloServlet.java

D:\raj\servlets\demo2>

Create the deployment descriptor (web.xml file)


How to deploy the servlet in tomcat?

1. Go to tomcat ->webapp
2. Create WEB-INF folder
3.create subfolder "classes", write "web.xml" file
paste the servlet class(i.e FirstServlet.class) in classes folder

<web-app>
<servlet>
 <servlet-name>example</servlet-name>
 <servlet-class>FirstServlet</servlet-class>
</servlet>
<servlet-mapping>
  <servlet-name>example</servlet-name>
 <url-pattern>/myfirstservlet</url-pattern>
</servlet-mapping>
</web-app>


4.save the file as web.xml, now its time to test our first servlet

Start the Server and Deploy the Project

5. start the tomcat server: go to tomcat in program files
bin->start .bat file or  double click on tomcat5.exe file


*/


How to Access the Servlet

Go to any browser

type in the address bar: localhost:8080/FirstServlet/myfirstservlet (press enter)
or

Type localhost:8080 in the address bar
(8080 is port number if you change the port number , type changed port number)

Then it display the Tomcat home like below.

Once you click on Manager App, one dialog box will display

User Name: admin
Password  :  xxxx

While we are installing Tomcat server, we can set the user name and password

Now it will display the all the applications which we had deployed.
click on Our Folder.


We got 404 error due to we did not write welcome list in web.xml, so we need to type
localhost:8080/FirstServlet/myfirstservlet (press enter)


*/

Tuesday 27 August 2013

first servlet program by using Note pad (without using IDE)

first servlet program by using Note pad (without using IDE)
developing the first servlet program

1. creating the home.html page
2. creating the servlet program (Example: lifycycleservlet)
3. creating deployment descriptor
4. deploying the application
5. running the application

Note:


1. creating the home.html page (NAME IT AS ANY NAME)


<html>
 <head>
  <title servlet example </title>
 </head>
 <body>
 <form action="myfirstServlet"><br/><br/><br/>
 <center>
 <input type="submit" value="invoke servlet lifecycle"/>
 </center>
  </form>
</body>
</html>


  • IT DISPLAYS THE WEBPAGE, ONCE YOU CLICK THE BUTTON IN THAT WEB PAGE, IT CALL THE "myfirstServlet" action
  • this webpage is mapped to servlet progame (Example: LifeCycleServlet.java) in web.xml
2. creating the servlet program (Example: lifycycleservlet)
Note: A Servlet is a Java class so let us begin by creating a new text document called LifeCycleServlet.java in the 'src' subfolder of the WEB-INF folder.

steps:

1. The Servlet begins by importing the packages required for the class 
Ex:
import javax.servlet.*; 
import javax.servlet.http.*; 
import java.io.*;

2. Next we define our Servlet class as extending the Servlet class

public class LifeCycleServlet extends Servlet
{


 }


Ex:


package com.rajendra.servlets;//this is optional, you can create any package
import javax.servlet.*;//this is mandatory
public class LifeCycleServlet implements Servlet
{
 public void init(ServletConfig sc)
 {
  System.out.println("init() method");
 }
 public void service(ServletRequest req, ServletResponse res) throws ServletException, java.io.IOException
 {
  java.io.PrintWriter out=res.getWriter();
  out.println("hi frm lifecycleservlet");
  System.out.println("in service");
 }
 public void destroy()
 {
  System.out.println("in destroy()");
 }
 public String getServletInfo()
 {
  return "LifeCycleServlet";
 }
 public ServletConfig getServletConfig()
 {
  return config;
 }
private ServletConfig config;
}

  • save this program with its class name
  • set the class path Ex: it it is Tomcat 5.5 version
  • D:\raj\servlets>set classpath=C:\Program Files\Apache Software Foundation\Tomcat
  •  5.5\common\lib\servlet-api.jar;
  • Now compile the servlet

  • Note:If you encountered the error "javax.servlet does not exist" then your classpath is incorrect 

  • D:\raj\servlets>javac LifeCycleServlet.java
  • D:\raj\servlets>

3. creating deployment descriptor (Test the Servlet)
We need to define each Servlet that you are intending to use in the web.xml file as follows.
The deployment descriptor is an XML document, used to describe the servlet container of the services supported by it.
According to Servlet API , each web application should have a web.xml file

<?xml version="1.0"?>
<!DOCTYPE web-app
PUBLIC "-//"sun Microsystems, Inc.//DTD web Application 2.3//EN"
"http://java.sun.com/dtd/web-app_2_3.dtd">

<web-app>
 <servlet>
  <servlet-name>LifeCycleServlet</servlet-name>
   <servlet-class>com.rajendra.servlets.LifeCycleServlet</servlet-class>
    </servlet>
     <servlet-mapping>
        <servlet-name>ServletLifeCycleServlet</servlet-name>
          <url-pattern>/myFirstServlet</url-pattern>
     </servlet-mapping>
</web-app>


  •   <servlet-name> tag explains a unique name LifeCycleServlet
  •    <servlet-class> tag explains a qualified name of a Servlet class, com.rajendra.servlets.LifeCycleServlet</servlet-class>
  • the <url-pattern> nested tag in <servlet-mapping> tag takes a string with / or *. This string is used to locate Servlet. we specified <url-pattern> /myFirstServlet which is a value specified in action attribute of home.html page.

4. deploying the application

  • first we need to compile the servlet program that is LifeCycleServlet.java
  • To compile the servlet program that is LifeCycleServlet.java we have to set the class path so that the javax.servlet package is available in the classpath. If we are using Tomcat server 5.5 set the class path as follows :
  • D:\raj\servlets\demoapp>set classpath=C:\Program Files\Apache Software Foundation\Tomcat 5.5\common\lib\servlet-api.jar;
  • For tomcat web server, this package comes inside the servlet-api-jar file and Web Logic Server, this package is present inside the weblogic.jar file.
  • If we are using Weglogic Server class path like this
  • set classpath=d:\bea\weblogic81\server\lib\weblogic.jar. (i assumed that that the weblogic server is installed in the D:\ bea folder 
  • after compiling the servlet program
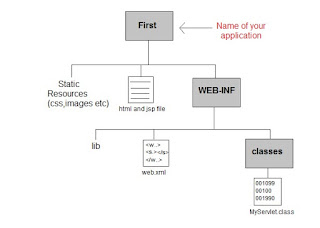
  • First of all let us create a new web application with the appropriate folder structure. In Tomcat you'll find a webapps folder below the installation folder. In this folder create a new subfolder called 'testapp' and a subfolder of this called WEB-INF. Below WEB-INF create two subfolders 'classes' and 'src' and a xml file 'web.xml'. Your folder structure should be similar to the following.
  • After compiling the Servlet, arrange the files as follows in your directory: Example:

  1. <demoapp>*.html
  2. \WEB-INF\web.xml
  3. \WEB-INF\lib\*.jar & *.zip (files if any)
  4. \WEB-INF\classes [\<package-name>]*.class

  • <demoapp> may contain .jsp, .html,jpg, and .gif files
  • the classes directory contains compiled java classes, including the Servlet used by the Web application.
  • the lib directory contains the .jar files used by the Web application. 
  • next prepare the war file using the jar tool. (to use the jar tool, open the command prompt and navigate to the work folder of your application (in our program,  it is demoapp folder)
  • type jar -cvf <war filename>.war*. for example, we type the following D:\raj\servlets\demoapp> run jar -cvf demoapp.war * or jar -cvf demoapp.war Home.html WEB-INF
Ex:
D:\raj\servlets\demoapp>jar -cvf demoapp.war
D:\raj\servlets\demoapp>jar -cvf demoapp.war Home.html WEB-INF


  • Now the appplication is ready to deploy on a server.

Note: Creating WAR files is optional as we create war file after completing the development phase of an application and next we go for production phase

Deploying the application


  1.  to deploy the application on the tomcat web server, copy the demoapp.war file into the <tomcat home>\webapps folder
  2. to deploy the application on the Weblogic application server, copy the demoapp.war file into the <weblogic domain root>\application folder
Running the Application->

start the server: to start the tomcat server,

  • go to start->program files->Apachi tomcat 5.5->Configure Tomcat->start the button->click on Ok button
  • to run the application, open the browser and type the URL 
  • if u are using Tomcat server use 
  • syntax: http://computer name or IP ADDRESS:port number/foldername/html name
  • Ex: http://rajendra:8080/demoapp/Home.html name

Sunday 18 August 2013

How servlet intercepts HTTP requests


Creating a servlet program

·         Creating a servlet program

Prerequisite:
1. Download any server (Ex: Tomcat, Weblogic,..)
2. Download the jar files and configure
    servlet-api.jar
3. JDK 7
4. Eclipse IDE for Java EE Developers (Juno 4.2)
5. import javax.servlet and javax.servlet.http packages

Table of Content:

1. Create Dynamic Web Project

2. Create Servlet class

3. Deploy the servlet

4. Run and test the servlet


·         Servlet is a java class, which resides in Tomcat(server), and tomcat is a server
Right click on our project i.e: simpleservletproject->new->servlet


 ·         Or if you unable to find servlet option, then choose other..and  we can find servlet option in Web


 ·         Click on next button


 ·         Here give the java package: Example: org.rajendra.improvejava, and class name is SimpleServlet(you can give any class name)

Here super class is HttpServlet, and click on Next button

·         Here I can enter the name of the servlet, it’s taken the default as the class name, and give the description name example: a simple servlet program


 ·         url mapping that is class name , click on Edit option


 ·         Click on Ok button
Now click on Next button


·    
·         Enable or disable the necessary methods, in this prog we don’t want contructor, doPost()
·         Click on finish button

·      
·         Write any statements in doGet() method
·         Now go to our package , and our program as per the below figure
·         Right click->run as->choose Run on Server
If you didn’t save it will ask you, click on Yes
It deploys inside the server


·         Click on Finish button


·         If you want you can use printwiter class to display in the webpage also
Write the PrinterWriter class reference and print the
import java.io.PrintWriter;


Saturday 17 August 2013

Tomcat server setup

Tomcat server setup
Installing tomcat server
·         Install tomcat server
·         Go to tomcat folder directory( eclipse and tomcat both are downloaded in a same folder)
·         Click on tomcat.exe
·         Open eclipse ide tool (i.e start eclipse)
·         Go to eclipse directory, and open eclipse ide
·         Set up tomcat inside eclipse

·         Select server tab, right click->select new server like below
click on select tomcat versions (example: Tomcat v6.0 Server) from Apache

Click on next
·         Click on browse->go to tamcat directory(Ex: C:\Program Files\Apache Software Foundation\Tomcat 6.0
Once you select Tomcat 6.0, Here click on ok

Here you select jdk1.6.0 from JRE pop up options bcoz Tomcat needs


Click on Finish button

Right click the tomcat bottom, and select start option
Then you will notice Console icon
Note:
 While we are starting tomcat server some times we may get error message, that time we have to change the port no or host name:
1st method:
Steps
·         1. Navigate to
C:\apache-tomcat-6.0.18\conf\server.xml
(The place where you have installed tomcat)
·         2. In server.xml file locate
1.  <!-- Define a non-SSL Coyote HTTP/1.1 Connector on port 8080 -->  
2.  <connector port="8080" maxthreads="150" minsparethreads="25" maxsparethreads="75" enablelookups="false" redirectport="8443" acceptcount="100" debug="0" connectiontimeout="20000" disableuploadtimeout="true">  
3.  <!-- Note : To disable connection timeouts, set connectionTimeout value to 0 -->  
4.  </connector>  
Or
1.  <connector port="8080" protocol="HTTP/1.1" connectiontimeout="20000" redirectport="8443">  
2.  </connector>  

(You can find something similar to the above snippet in server.xml.  It varies according to tomcat version)
change Connector port="8080" to Connector port="8081" or some other port number. Make sure that the port number in not used by some other application.
·         3. Save and restart tomcat.
·         4 .Now try running with the new port number i.e. http://localhost:8081

Mappings of IP addresses to hostnames

(Change localhost to some other name)


Operationg System: 
·         Windows XP
Steps
·         1. Navigate to
C:\WINDOWS\system32\drivers\etc

Or
start->All Programs->Run-> type 'drivers'  (Without quotes)->etc
·         2. Open the file host with a text editor and change
127.0.0.1       localhost
To
127.0.0.1       projectname


·         3. Restart Tomcat and Try http://projectname:8080/

# host file contains the mappings of IP addresses (in our case 127.0.0.1) to 
#host names (localhost). Each
# entry should be kept on an individual line. The IP address should
# be placed in the first column followed by the corresponding host name.
# The IP address and the host name should be separated by at least one
# space.
#
# Additionally, comments (such as these) may be inserted on individual
# lines or following the machine name denoted by a '#' symbol.
#
# For example:
#
#      102.54.94.97     rhino.acme.com          # source server
#       38.25.63.10     x.acme.com              # x client host
*/

You can see the last line that server start up in 1674
Now you can observe that tomcat server has started


 In order to test this, open a browser window and access the default URL


 TYPE URL : localhost:8080

Or

If you change the host name as projectname, then type in the browser address url: projectname:80801 . if you unable to find the server tab in eclipse?

Ans: go to window from eclipse menu->show view->other->and search for server->press ok
1.       When we attempting to test the tomcat server, we may get pagenot found exception?


Ans:
Ans: go to right click on tomcat
Click switch location and click on apply and ok
·         Go to left hand side tomcat server
·         Right click->properties
Double click on configuration like below picture:

·         And make sure
·         Enable “use Tomcat installation”

You may like the following posts: